I love Halloween and the image of a witch in the Moon has always been a favorite. This new Circle Framelit is perfect for this scene! I used the framelit to cut the designer paper so it would score and fit perfectly to the card base. The Illuminate ink makes the bats glow! I embossed each side with the RETIRED Spider web embossing folder. And added some glitter to the designer paper for a bit of bling. And the Bat eyes.
Ingredients:
Circle Framelit
2 1/2 Circle punch 120906 $16.95
Halloween Hello 131718 Wood $18.95, 131721 Clear $14.95
Witches Brew designer paper 132185 $10.95
Black & Orange Stampin' Glitter 132206 $7.95
Illuminate Glimmer Watermark ink 126857 $10.95
Basic Black ink 126980 $5.95
Naturals Ivory card stock 101849 $7.50
Basic Black card stock 121045 $6.95
Summer Starfruit card stock 126839 $6.95
Order Online 24/7: www.kathyswanson.stampinup.net
Wednesday, August 7, 2013
Tuesday, August 6, 2013
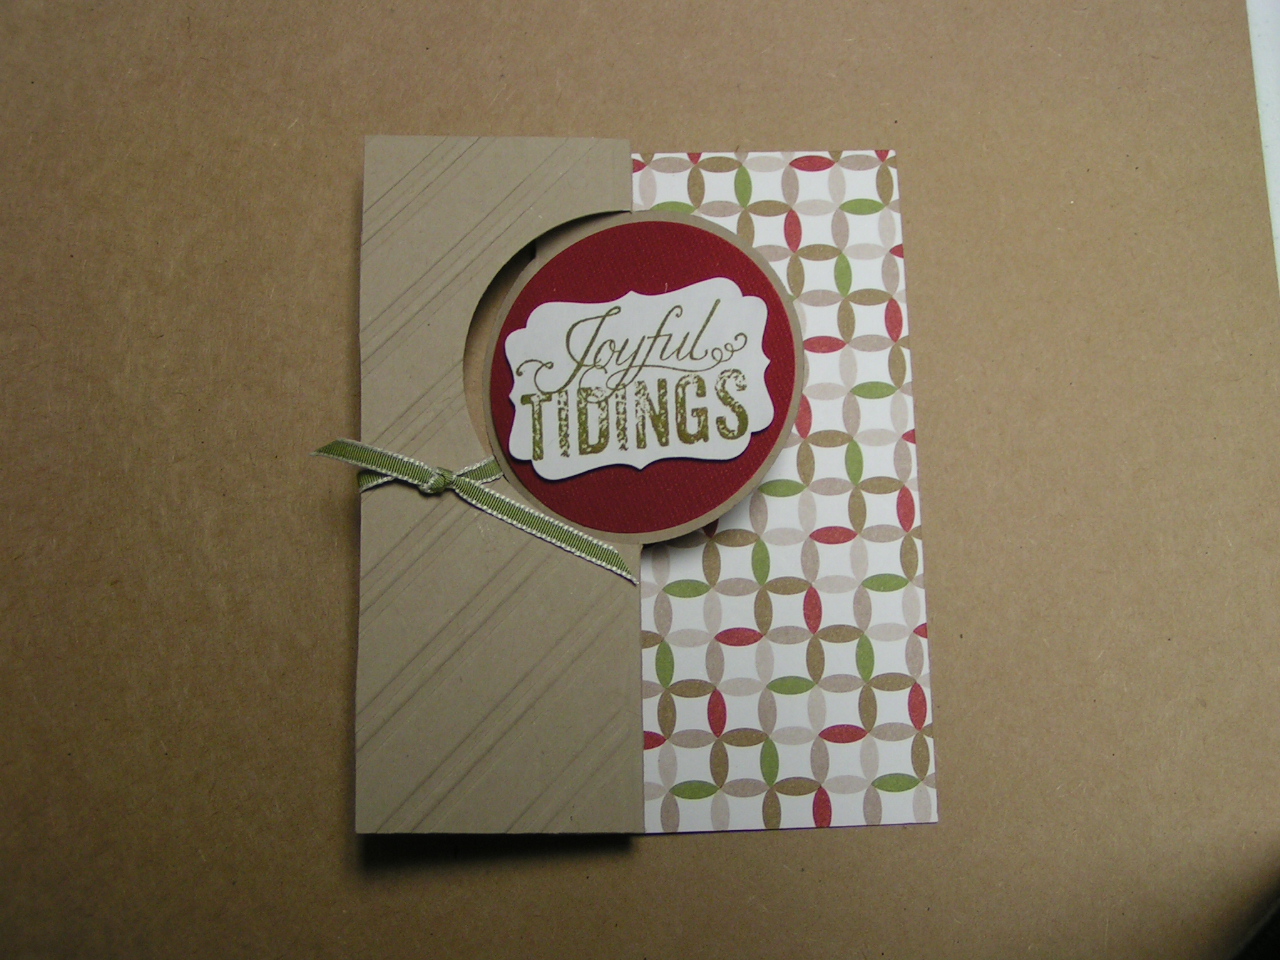
Holiday Circle Framelit
I am finally using my prize from Convention and here is a Holiday version. This framelit cuts and scores.
I added some Designer paper to the inside flap and embossed the front flap with the Stylish Stripes embossing folder. The 2 1/2 Circle punch fits perfectly in the space and the Greeting is punched with the Decorative Label punch. The Scallop circle in the framelit set is used on the inside and that sentiment is punched with the 1 3/4 scallop circle punch. Love the layers and the sentiments in this stamp set Christmas messages!!
Ingredients:
Circle Thinlit Die 133480 $32.95
Season of Style Designer paper 132340 $10.95
Christmas Messages Wood 131790 $28.95, Clear 131793 $20.95
2 1/2 Circle punch 120906 $16.95
1 3/4 Scallop Circle punch 119854 $16.95
Decorative Label punch 120907 $16.95
Stylish Stripes embossing folder 132174 $7.95
Crumb Cake card stock 120953 $6.95
Cherry Cobbler card stock 119685 $6.95
Cherry Cobbler ink 126966 $5.95
Old Olive ink 126953 $5.95
Old Olive 1/8 Taffeta ribbon 119256 $5.95
Shop Online 24/7: www.kathyswanson.stampinup.net
I added some Designer paper to the inside flap and embossed the front flap with the Stylish Stripes embossing folder. The 2 1/2 Circle punch fits perfectly in the space and the Greeting is punched with the Decorative Label punch. The Scallop circle in the framelit set is used on the inside and that sentiment is punched with the 1 3/4 scallop circle punch. Love the layers and the sentiments in this stamp set Christmas messages!!
Ingredients:
Circle Thinlit Die 133480 $32.95
Season of Style Designer paper 132340 $10.95
Christmas Messages Wood 131790 $28.95, Clear 131793 $20.95
2 1/2 Circle punch 120906 $16.95
1 3/4 Scallop Circle punch 119854 $16.95
Decorative Label punch 120907 $16.95
Stylish Stripes embossing folder 132174 $7.95
Crumb Cake card stock 120953 $6.95
Cherry Cobbler card stock 119685 $6.95
Cherry Cobbler ink 126966 $5.95
Old Olive ink 126953 $5.95
Old Olive 1/8 Taffeta ribbon 119256 $5.95
Shop Online 24/7: www.kathyswanson.stampinup.net
Monday, August 5, 2013
Beautiful Bows
These Bows are great and I may add a few to my WINTER banner. They go together really quick and the Big Shot does all the work for you! Cuts and scores, add a few glue dots and the BOW is done. Here are a few different looks.
Ingredients:
Gift Bow Bigz L Die 129977 $32.95
Brushed Silver card stock 100712 $7.95 (10 sheets)
Winter Frost Designer Paper 132341 $12.95
Frosted Finishes Embellishments 132150 $6.95 (12) WOW these SPARKLE!!
Shop Online 24/7: www.kathyswanson.stampinup.net
Ingredients:
Gift Bow Bigz L Die 129977 $32.95
Brushed Silver card stock 100712 $7.95 (10 sheets)
Winter Frost Designer Paper 132341 $12.95
Frosted Finishes Embellishments 132150 $6.95 (12) WOW these SPARKLE!!
Shop Online 24/7: www.kathyswanson.stampinup.net
Sunday, August 4, 2013
Winter Banner
This Banner is still a work in progress, but I was able to lay out my plan and take some pictures. I used 6 more flags from my Build A Banner kit, that still leaves 9 more flags! My next project will be FALL, so 5 left. What a GREAT value! I will be adding Build a Banner classes to my calendar, to help get you started. Cause once you start your mind will be full of ideas!
I did use the Christmas Banner Accessory Kit with a few added goodies of my own. Our new Festive Flurry Framelits are perfect for this banner and even embossed a few with the Northern Flurry embossing folder. I have not attached the lollies yet cause I am going to add clips to the back so they are movable!! The letters were colored with a Sponge dauber in our new Silver Metallic Encore pad. I then spritzed the flags with Island Indigo or Pool Party spritz, alternating each color. I used our Beautiful but RETIRED gray ribbon as the string and ribbons from the kit to accent the cut out Snowflakes.


I need to press the flags and some of the creases out of the ribbon from the kit and will post a finished picture hanging from my mantle soon. I can't wait to start FALL and use the leaf die, OOH the possibilities!!
Ingredients:
Build A Banner Simply Created kit 133507 $19.95
Christmas Banner Simply Created accessory kit 132697 $9.95
Festive Flurry Framelits Dies 132193 $24.95 (Available in a Bundle with matching stamps see pg 30)
Metallic Encore Silver stamp pad 132142 $9.95
Foil Sheets Silver 132178 $3.95
Island Indigo re-inker 122932 $2.95
Pool Party re-inker 122933 $2.95
Stampin Spritzer 126185 $2.95 (2)
Order Online 24/7: www.kathyswanson.stampinup.net
I did use the Christmas Banner Accessory Kit with a few added goodies of my own. Our new Festive Flurry Framelits are perfect for this banner and even embossed a few with the Northern Flurry embossing folder. I have not attached the lollies yet cause I am going to add clips to the back so they are movable!! The letters were colored with a Sponge dauber in our new Silver Metallic Encore pad. I then spritzed the flags with Island Indigo or Pool Party spritz, alternating each color. I used our Beautiful but RETIRED gray ribbon as the string and ribbons from the kit to accent the cut out Snowflakes.
I need to press the flags and some of the creases out of the ribbon from the kit and will post a finished picture hanging from my mantle soon. I can't wait to start FALL and use the leaf die, OOH the possibilities!!
Ingredients:
Build A Banner Simply Created kit 133507 $19.95
Christmas Banner Simply Created accessory kit 132697 $9.95
Festive Flurry Framelits Dies 132193 $24.95 (Available in a Bundle with matching stamps see pg 30)
Metallic Encore Silver stamp pad 132142 $9.95
Foil Sheets Silver 132178 $3.95
Island Indigo re-inker 122932 $2.95
Pool Party re-inker 122933 $2.95
Stampin Spritzer 126185 $2.95 (2)
Order Online 24/7: www.kathyswanson.stampinup.net
Saturday, August 3, 2013
Boo Banner
These Banner kits are a MUST have! Sara(Shelli's Daughter) featured these kits at Convention and I could not wait to get mine and get started. This first Banner is very simple and only uses the pre-cut canvas banners and stencils from the Build A Banner Simply Created Kit. You get 18 canvas pennants, alphabet stencils, pattern stencils, Spritzers and jute twine!! Plenty to make many banners!!
Sorry about the picture quality, taken with my phone. But you get the drift.....I spritzed with Basic Black and Pumpkin Pie. To blend your spritz, use 3-5 drops of re-inker with rubbing alcohol. This dries faster then water and will do several banners. Additional spritzers can be purchased 2 for $2.95!! Item 126185.
I added buttons in the center of each letter and used some retired ribbon to string the banner. My Winter Banner is almost finished and I used the Accessory Kit to embellish this one. Come back tomorrow to see the finished project!
Ingredients:
Build a Banner Simply Created kit 133507 $19.95
Pumpkin Pie Re-inker 105229 $2.95
Basic Black re-inker 102510 $2.95
Shop Online 24/7: www.kathyswanson.stampinup.net
Sorry about the picture quality, taken with my phone. But you get the drift.....I spritzed with Basic Black and Pumpkin Pie. To blend your spritz, use 3-5 drops of re-inker with rubbing alcohol. This dries faster then water and will do several banners. Additional spritzers can be purchased 2 for $2.95!! Item 126185.
I added buttons in the center of each letter and used some retired ribbon to string the banner. My Winter Banner is almost finished and I used the Accessory Kit to embellish this one. Come back tomorrow to see the finished project!
Ingredients:
Build a Banner Simply Created kit 133507 $19.95
Pumpkin Pie Re-inker 105229 $2.95
Basic Black re-inker 102510 $2.95
Shop Online 24/7: www.kathyswanson.stampinup.net
Friday, August 2, 2013
Sweater Weather 2
On my return flight from Salt Lake City I sat with the nicest Demo from the Denver area. We chatted and looked at each others swaps. I drew a sketch of a card layout that I had never seen before. Here is my first attempt at this layout. The Original had another panel, but it was not working for me today......so we'll go with a simple version.
The Very Vanilla Card base is 8 1/2 X 4 1/4. I then cut off 2 1/2 inches on the front panel. The Sweater Weather paper is 3 X 4. I used scraps of Crushed Curry card stock at the top and bottom and embossed with the Chevron embossing folder. I then adhered this panel to the card front. The Chevron Block from was stamped in Chocolate Chip ink on Very Vanilla card stock and then matted on Chocolate Chip card stock. I scruffed the edges. The sentiment was stamped in Chocolate Chip ink and punched with the Oval punch and matted on a Xlarge Oval of Chocolate Chip. 3 Bitty punch pack Crushed Curry flowers and pearls accent this panel.
The Acorn was inked in Crushed Curry and then rolled on the Chocolate Chip ink pad and then stamped on the lower left corner.
I love how you get a peek at the inside of the card and still have room for an inside sentiment.
Ingredients:
Sweater Weather Designer paper
Chocolate Chip card stock
Very Vanilla card stock
Crushed Curry card stock
Chevron embossing folder
XL Oval Punch
Large Oval punch
Bitty punch pack
Pearls
The Very Vanilla Card base is 8 1/2 X 4 1/4. I then cut off 2 1/2 inches on the front panel. The Sweater Weather paper is 3 X 4. I used scraps of Crushed Curry card stock at the top and bottom and embossed with the Chevron embossing folder. I then adhered this panel to the card front. The Chevron Block from was stamped in Chocolate Chip ink on Very Vanilla card stock and then matted on Chocolate Chip card stock. I scruffed the edges. The sentiment was stamped in Chocolate Chip ink and punched with the Oval punch and matted on a Xlarge Oval of Chocolate Chip. 3 Bitty punch pack Crushed Curry flowers and pearls accent this panel.
The Acorn was inked in Crushed Curry and then rolled on the Chocolate Chip ink pad and then stamped on the lower left corner.
I love how you get a peek at the inside of the card and still have room for an inside sentiment.
Ingredients:
Sweater Weather Designer paper
Chocolate Chip card stock
Very Vanilla card stock
Crushed Curry card stock
Chevron embossing folder
XL Oval Punch
Large Oval punch
Bitty punch pack
Pearls
Thursday, August 1, 2013
Sweater Weather
It has been Sweater Weather here this past week and this Designer Paper in the Holiday Catalog is Warm and Lovely!! The colors glow with warmth and work so well with the Fall stamps.
Today I am showing you 3 patterns from this paper and a great Fall stamp set.
I cut the Chocolate Chip pattern 2 X 5 1/2, the other patterns 1 X 12 and used the Hexagon punch to flag the ends. A 1/2 X 3 piece of Crushed Curry was embossed with the Houndstooth embossing folder and popped up over the Designer Paper. I stamped the sentiment from in Chocolate Chip ink and embossed the entire card front with the Argyle embossing folder. Unfortunately I embossed the wrong direction, but I've seen many cards embossed this way, so I guess I will let this one slide! The Acorns were stamped in Chocolate Chip and punched with the 1 1/4 Circle punch and layered on a 1 3/8 punch of Tangerine Tango. Popped these up also. Love the simplicity of this card and the versatility of this paper.
Ingredients:
Sweater Weather Designer paper
Crushed Curry card stock
Very Vanilla cars stock
Chocolate Chip ink
Houndstooth embossing folder
Argyle embossing folder
Shop Online 24/7: www.kathyswanson.stampinup.net
Today I am showing you 3 patterns from this paper and a great Fall stamp set.
I cut the Chocolate Chip pattern 2 X 5 1/2, the other patterns 1 X 12 and used the Hexagon punch to flag the ends. A 1/2 X 3 piece of Crushed Curry was embossed with the Houndstooth embossing folder and popped up over the Designer Paper. I stamped the sentiment from in Chocolate Chip ink and embossed the entire card front with the Argyle embossing folder. Unfortunately I embossed the wrong direction, but I've seen many cards embossed this way, so I guess I will let this one slide! The Acorns were stamped in Chocolate Chip and punched with the 1 1/4 Circle punch and layered on a 1 3/8 punch of Tangerine Tango. Popped these up also. Love the simplicity of this card and the versatility of this paper.
Ingredients:
Sweater Weather Designer paper
Crushed Curry card stock
Very Vanilla cars stock
Chocolate Chip ink
Houndstooth embossing folder
Argyle embossing folder
Shop Online 24/7: www.kathyswanson.stampinup.net
Subscribe to:
Posts (Atom)


